Introduction
In this world every information we receive like GPS, Television Channels, weather forecast and flights, etc all of this have a big contribution of satellites. Do you know, that we can intercept satellites communication, as detailed by researcher of International Institute of Cyber Security.
Basically, satellites are of two types Natural and Artificial satellites. Satellites which are space fix are called Natural satellites such as, moon is a satellite to earth, which moves in elliptical orbit. Artificial Satellites is an object, which is intentionally placed into an orbit.
- Basically, Satellite is divided into two parts one is the communication module and Mechanical Module
- Communication Module: The Main aim of communication Module is collecting the information and sends to the Ground Station.
- Mechanical Module: This module we see Engine and cylinders prepared with carbon fibers. This is used to change the satellite orbit.
- Satellites are also divided into three type:
- Lower Earth orbit satellite: These satellites are placed in between 100 – 2000 Km away from earth. It moves faster around the earth and it has a capacity to scan the Earth more the 100 times in a day. We use this satellite for imaging and scanning, examples like CARTOSAT-2 we call this satellite as EYE to India.
- Medium Earth Orbit Satellite: These satellites are placed between 2000 – 35790 Km away from earth. It moves around the earth at a fixed speed of 7000Km/HR and fixed orbit. We use this for GPS navigation.
- Geosynchronous Orbit Satellite: These satellites are placed 35790 km away from the earth. This satellite rotates around the earth, equal to the earth’s speed. We use this view as the fixed point that might be a particular location. We use this for communication, broadcasting, and weather reports.
Now coming to this Gpredict, it is a real-time satellite tracking tool. By using this tool we can Track Satellites in Real Time. This tool can display the satellite with name, position like orbit, and data with a map. Gpredict can analyze the future satellite passes and it also provides the data about each pass.
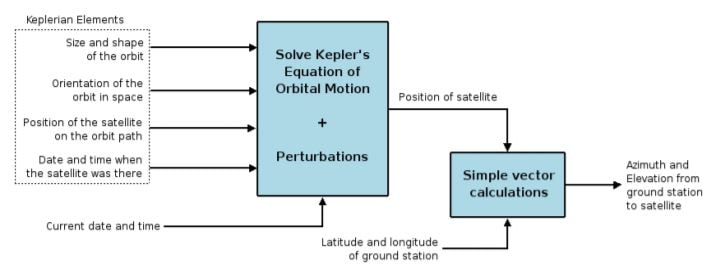
- Gpredict like any other tracking satellites takes three types of input
- Keplerian elements this will describe the orbit of the satellite, position, and velocity of that satellite.
- Ground station’s position on the earth.
- For Calculating the satellite position and velocity at which time and date.
Now we will move to the Environment, used to install this tool.
Environment
- OS: Kali Linux 2019.3 64 bit
- Kernel Version: 5.2.0
Installation Steps
- Before installing the tool, we have to install the dependencies by using the below commands
- sudo apt install libtool intltool autoconf automake libcurl4-openssl-dev
root@kali:/home/iicybersecurity# sudo apt install libtool intltool autoconf automake libcurl4-openssl-dev
Reading package lists... Done
Building dependency tree
Reading state information... Done
The following additional packages will be installed:
  autotools-dev gettext libltdl-dev libltdl7 m4
Suggested packages:
  autoconf-archive gnu-standards autoconf-doc gettext-doc autopoint libasprintf-dev libgettextpo-dev libcurl4-doc libidn11-dev libkrb5-dev libldap2-dev librtmp-dev libssh2-1-dev
  libtool-doc gfortran | fortran95-compiler gcj-jdk m4-doc
The following NEW packages will be installed:
  autoconf automake autotools-dev gettext intltool libcurl4-openssl-dev libltdl-dev libtool m4
The following packages will be upgraded:
  libltdl7
1 upgraded, 9 newly installed, 0 to remove and 1555 not upgraded.
Need to get 1,235 kB/4,224 kB of archives.
After this operation, 14.9 MB of additional disk space will be used.
Do you want to continue? [Y/n] y
Get:1 http://ftp.harukasan.org/kali kali-rolling/main amd64 automake all 1:1.16.2-1 [775 kB]
Get:2 http://ftp.harukasan.org/kali kali-rolling/main amd64 intltool all 0.51.0-5 [50.2 kB]
Get:3 http://ftp.harukasan.org/kali kali-rolling/main amd64 libcurl4-openssl-dev amd64 7.68.0-1 [410 kB]
Fetched 1,235 kB in 7s (174 kB/s)
===============================================================================================SNIP================================================================================================
Unpacking libtool (2.4.6-14) ...
Setting up gettext (0.19.8.1-10) ...
Setting up m4 (1.4.18-4) ...
Setting up autotools-dev (20180224.1) ...
Setting up libcurl4-openssl-dev:amd64 (7.68.0-1) ...
Setting up libltdl7:amd64 (2.4.6-14) ...
Setting up autoconf (2.69-11.1) ...
Setting up automake (1:1.16.2-1) ...
update-alternatives: using /usr/bin/automake-1.16 to provide /usr/bin/automake (automake) in auto mode
Setting up libtool (2.4.6-14) ...
Setting up libltdl-dev:amd64 (2.4.6-14) ...
Setting up intltool (0.51.0-5) ...
Processing triggers for man-db (2.8.6.1-1) ...
Processing triggers for libc-bin (2.29-10) ...
Scanning processes...
Scanning candidates...
Scanning linux images...

Running kernel seems to be up-to-date.

No services need to be restarted.

No containers need to be restarted.

User sessions running outdated binaries:
 Debian-gdm @ user manager service: systemd[570]
 root @ session #2: gnome-session-b[926]
 root @ user manager service: systemd[888]
- Now, use this command to install another dependency
- sudo apt install pkg-config libglib2.0-dev libgtk-3-dev libgoocanvas-2.0-dev
root@kali:/home/iicybersecurity# sudo apt install pkg-config libglib2.0-dev libgtk-3-dev libgoocanvas-2.0-dev
Reading package lists... Done
Building dependency tree
Reading state information... Done
The following additional packages will be installed:
  at-spi2-core dbus dbus-x11 fontconfig-config gir1.2-atk-1.0 gir1.2-atspi-2.0 gir1.2-gdkpixbuf-2.0 gir1.2-goocanvas-2.0 gir1.2-gtk-3.0 gir1.2-harfbuzz-0.0 gir1.2-pango-1.0 icu-devtools
  libatk-bridge2.0-0 libatk-bridge2.0-dev libatk1.0-0 libatk1.0-data libatk1.0-dev libatspi2.0-0 libatspi2.0-dev libcairo-script-interpreter2 libcairo2-dev libdatrie-dev libdatrie1
  libdbus-1-3 libdbus-1-dev libegl-dev libegl1 libegl1-mesa-dev libepoxy-dev libepoxy0 libfontconfig-dev libfontconfig1 libfontconfig1-dev libfreetype-dev libfreetype6 libfreetype6-dev
  libfribidi-dev libfribidi0 libgdk-pixbuf2.0-0 libgdk-pixbuf2.0-bin libgdk-pixbuf2.0-common libgdk-pixbuf2.0-dev libgl-dev libgl1 libgl1-mesa-dev libgles-dev libgles1 libgles2
  libglib2.0-0 libglib2.0-bin libglib2.0-dev-bin libglvnd-dev libglvnd0 libglx-dev libglx0 libgoocanvas-2.0-9 libgoocanvas-2.0-common libgraphite2-3 libgraphite2-dev libgtk-3-0
  libgtk-3-common libharfbuzz-dev libharfbuzz-gobject0 libharfbuzz-icu0 libharfbuzz0b libice-dev libicu-dev libicu63 libopengl-dev libopengl0 libpango-1.0-0 libpango1.0-dev
  libpangocairo-1.0-0 libpangoft2-1.0-0 libpangoxft-1.0-0 libpixman-1-dev libpng-dev libpng-tools libpng16-16 libpthread-stubs0-dev libsm-dev libthai-dev libthai0 libwayland-bin
  libwayland-client0 libwayland-cursor0 libwayland-dev libwayland-egl1 libwayland-server0 libx11-6 libx11-dev libxau-dev libxcb-render0 libxcb-render0-dev libxcb-shm0 libxcb-shm0-dev
  libxcb1 libxcb1-dev libxcomposite-dev libxcomposite1 libxcursor-dev libxdamage-dev libxdamage1 libxdmcp-dev libxext-dev libxfixes-dev libxfixes3 libxft-dev libxi-dev libxinerama-dev
  libxkbcommon-dev libxkbcommon-x11-0 libxkbcommon0 libxrandr-dev libxrender-dev libxtst-dev pango1.0-tools wayland-protocols x11proto-core-dev x11proto-dev x11proto-input-dev
  x11proto-randr-dev x11proto-record-dev x11proto-xext-dev x11proto-xinerama-dev xorg-sgml-doctools xtrans-dev
Suggested packages:
  libcairo2-doc libdatrie-doc freetype2-doc libgirepository1.0-dev libglib2.0-doc libgraphite2-utils libgtk-3-doc libice-doc icu-doc imagemagick libpango1.0-doc libsm-doc libthai-doc
  libwayland-doc libx11-doc libxcb-doc libxext-doc
===============================================================================================SNIP================================================================================================
Running kernel seems to be up-to-date.

Restarting services...
 systemctl restart accounts-daemon.service colord.service polkit.service rtkit-daemon.service udisks2.service upower.service
Service restarts being deferred:
 systemctl restart ModemManager.service
 systemctl restart NetworkManager.service
 /etc/needrestart/restart.d/dbus.service
 systemctl restart gdm.service
 systemctl restart gdm3.service
 systemctl restart wpa_supplicant.service

No containers need to be restarted.

User sessions running outdated binaries:
 Debian-gdm @ user manager service: at-spi-bus-laun[713], systemd[570]
 root @ session #2: gdm-session-wor[884], gdm-x-session[917], gnome-keyring-d[913], gnome-session-b[926], gsd-printer[1183]
 root @ user manager service: at-spi-bus-laun[987], gvfsd[1024], systemd[888]
- Now, use this command to clone the project.
- git clone https://github.com/csete/gpredict
root@kali:/home/iicybersecurity# git clone https://github.com/csete/gpredict
Cloning into 'gpredict'...
remote: Enumerating objects: 11130, done.
remote: Total 11130 (delta 0), reused 0 (delta 0), pack-reused 11130
Receiving objects: 100% (11130/11130), 17.31 MiB | 1.28 MiB/s, done.
Resolving deltas: 100% (7691/7691), done
- Next, use the cd command to enter into gpredict directory.
root@kali:/home/iicybersecurity# cd gpredict/
root@kali:/home/iicybersecurity/gpredict#
- Now, use this command to give authoritative to the file.
- ./autogen.sh
root@kali:/home/iicybersecurity/gpredict# ./autogen.sh
- glib-gettextize.
Copying file po/Makefile.in.in

Please add the files
  codeset.m4 gettext.m4 glibc21.m4 iconv.m4 isc-posix.m4 lcmessage.m4
  progtest.m4
from the /usr/share/aclocal directory to your autoconf macro directory
or directly to your aclocal.m4 file.
You will also need config.guess and config.sub, which you can get from
===============================================================================================SNIP================================================================================================
config.status: creating pixmaps/logos/Makefile
config.status: creating pixmaps/icons/Makefile
config.status: creating data/Makefile
config.status: creating data/desktop/Makefile
config.status: creating data/satdata/Makefile
config.status: creating po/Makefile.in
config.status: creating build-config.h
config.status: executing depfiles commands
config.status: executing libtool commands
config.status: executing default-1 commands
- Next, use this command Make to build the executable program.
root@kali:/home/iicybersecurity/gpredict# make
echo 2.3.70-8e1b5 > .version-t && mv .version-t .version
make  all-recursive
make[1]: Entering directory '/home/iicybersecurity/gpredict'
Making all in src
make[2]: Entering directory '/home/iicybersecurity/gpredict/src'
Making all in sgpsdp
make[3]: Entering directory '/home/iicybersecurity/gpredict/src/sgpsdp'
Making all in TR
make[4]: Entering directory '/home/iicybersecurity/gpredict/src/sgpsdp/TR'
make[4]: Nothing to be done for 'all'.
make[4]: Leaving directory '/home/iicybersecurity/gpredict/src/sgpsdp/TR'
make[4]: Entering directory '/home/iicybersecurity/gpredict/src/sgpsdp'
=================================================================================================SNIP==============================================================================================
  MSGFMT fr.gmo
  MSGFMT id.gmo
  MSGFMT it.gmo
  MSGFMT lt.gmo
  MSGFMT ru.gmo
  MSGFMT th.gmo
  MSGFMT uk.gmo
make[2]: Leaving directory '/home/iicybersecurity/gpredict/po'
make[2]: Entering directory '/home/iicybersecurity/gpredict'
make[2]: Leaving directory '/home/iicybersecurity/gpredict'
make[1]: Leaving directory '/home/iicybersecurity/gpredict'
- Now, use this command make install to copy the built program, libraries, and documents to the exact location.
root@kali:/home/iicybersecurity/gpredict# make install
make  install-recursive
make[1]: Entering directory '/home/iicybersecurity/gpredict'
Making install in src
make[2]: Entering directory '/home/iicybersecurity/gpredict/src'
Making install in sgpsdp
make[3]: Entering directory '/home/iicybersecurity/gpredict/src/sgpsdp'
Making install in TR
make[4]: Entering directory '/home/iicybersecurity/gpredict/src/sgpsdp/TR'
make[5]: Entering directory '/home/iicybersecurity/gpredict/src/sgpsdp/TR'
make[5]: Nothing to be done for 'install-exec-am'.
make[5]: Nothing to be done for 'install-data-am'.
make[5]: Leaving directory '/home/iicybersecurity/gpredict/src/sgpsdp/TR'
make[4]: Leaving directory '/home/iicybersecurity/gpredict/src/sgpsdp/TR'
make[4]: Entering directory '/home/iicybersecurity/gpredict/src/sgpsdp'
  CCLD     test-001
  CCLD     test-002
=================================================================================================SNIP==============================================================================================
installing th.gmo as /usr/local/share/locale/th/LC_MESSAGES/gpredict.mo
installing uk.gmo as /usr/local/share/locale/uk/LC_MESSAGES/gpredict.mo
make[2]: Leaving directory '/home/iicybersecurity/gpredict/po'
make[2]: Entering directory '/home/iicybersecurity/gpredict'
make[3]: Entering directory '/home/iicybersecurity/gpredict'
make[3]: Nothing to be done for 'install-exec-am'.
/usr/bin/install -c -m 644 ./AUTHORS /usr/local/share/gpredict
/usr/bin/install -c -m 644 ./NEWS /usr/local/share/gpredict
/usr/bin/install -c -m 644 ./README /usr/local/share/gpredict
/usr/bin/install -c -m 644 ./COPYING /usr/local/share/gpredict
make[3]: Leaving directory '/home/iicybersecurity/gpredict'
make[2]: Leaving directory '/home/iicybersecurity/gpredict'
make[1]: Leaving directory '/home/iicybersecurity/gpredict'
- Now, use this command to launch directly the gpredict tool.
- gpredict
root@kali:/home/iicybersecurity/gpredict# gpredict
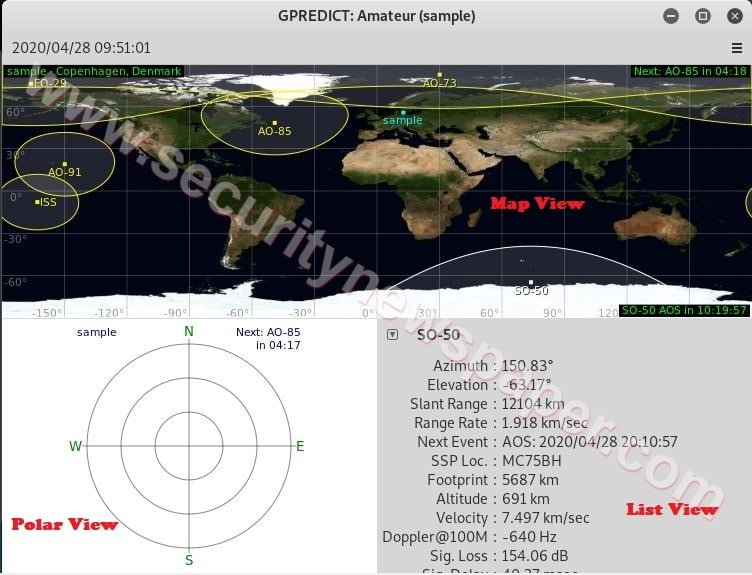
- In the above picture, we see MAP view, Polar View and List view
- Map View: In the map view, we can see the satellites and its covered area.
- Polar View: in the polar view or radius view we can see whether the satellite is in plot range.
- List View: In the list view, we can see the complete details about the satellite.
Adding Module/Satellite
Here, we can also configure our own module by selecting the few different satellites and adding them to our module. Similar steps are replicated by ethical hacking researchers of IICS in their testing labs.
In the Gpredict tool database we have around 1200 satellites. Select any satellites.
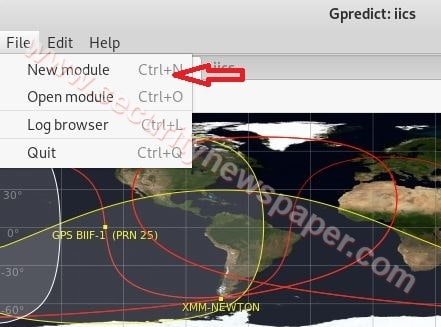
- Firstly, click on file menu and select New Module, we get below screen.
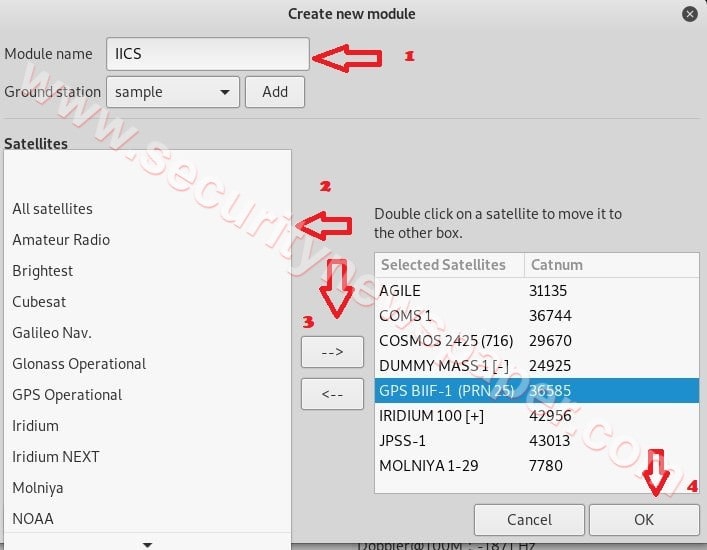
- Step 1 we have set the module name to IICS
- Step 2 select the satellites, which we want to add in our module.
- Step3 Click on forward Arrow to add the satellite in our module
- Step4 Click on OK
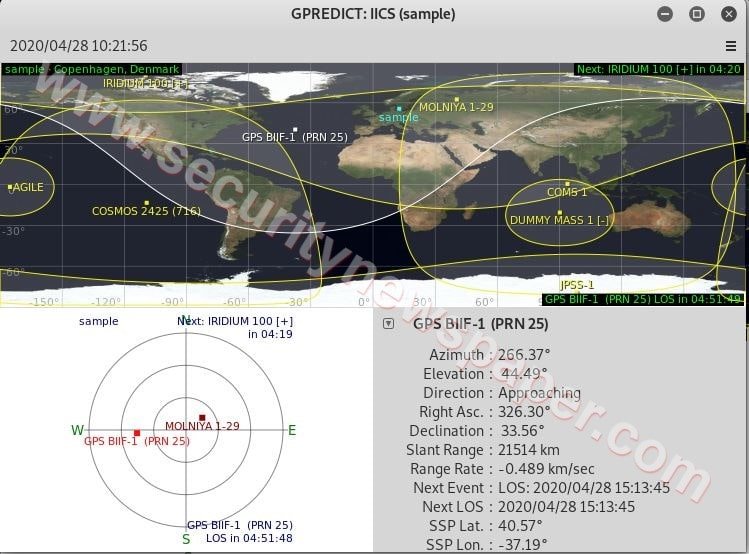
- Now, we see the IICS module that displays the preferred satellites has been added in Map View.
Modules Properties
While creating the modules, we can also select the properties. To view the page for example List view, a Map view, layout, and polar view.
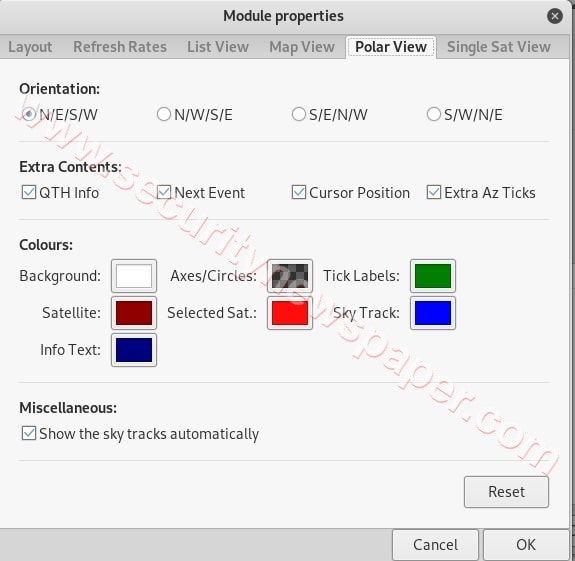
Finally click on Ok to save the location.
Satellite Passes
In this tool, we can also analyze passes that are available for radio communication with the ground station.
- This is viewed, when we right-click on a particular satellite. For current pass and next pass can be viewed in three different ways with the same details (Data, Polar, and Az/El), exact for Future pass.
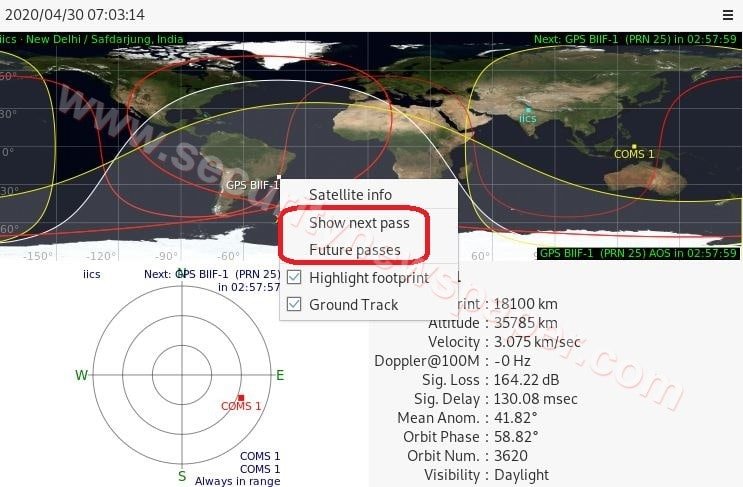
- Here, we see the passes option, when we click this is what we get.

Satellite Info
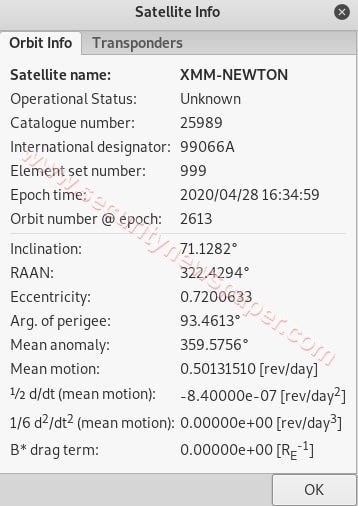
When we right-click on a satellite, we can find complete details about a satellite
The SKY at a Glance
Right side we see a menu options, there we can find the sky at a glance.

The sky at a glance will give us quick overview of satellite passes that we can expect at our location next X hours. It is a convenience function in Gpredict.

TLE (Two-Line Element) Data
To perform this option, go to Edit menu and Update TLE Files
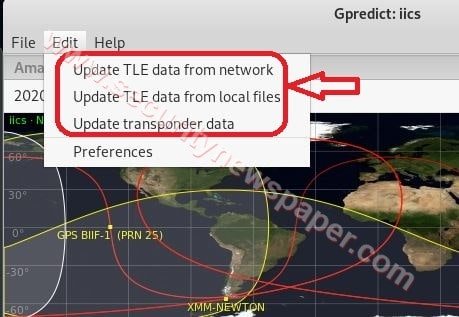
- TLE (Two-Line Element) is created by NORAD this commonly share the position and velocity information about different satellites.
- It also describes orbital elements of earth-orbiting objects for a given point time.
- In this tool two-line element are of two type, Update TLE data from the network and Update TLE data from Files
Update Transponder: Transponder is a wireless communication or controls the device. This will pick up and respond automatically to an incoming signal.

Preference
When we click Edit –>Preferences
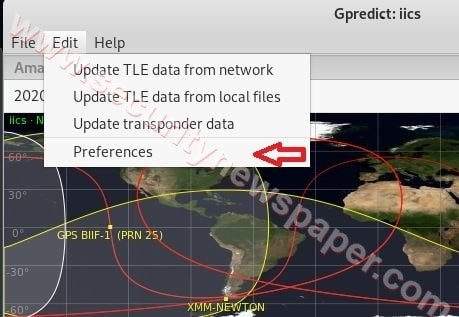
- There we see four more options General, Modules, Interfaces and Predict
Preferences – General
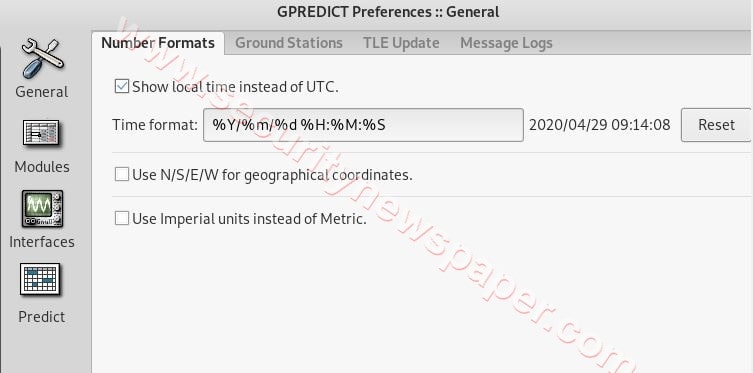
- General: In general we can set the default setting that need to be displayed on the page. In this, we have a few different options like Number Formats, ground Station, TLE Update, Message Logs.
- Number Formats: The Number Format describes how to display the number on-page. That might be time and date, geographical coordinates.
- Ground Station: In this tool, we have an option to add the ground station to our own module. Click on Ground Station at the bottom we can find the option Add new. There we can enter the location details manually or we can also select the state, to be added by clicking on select to choose a location.
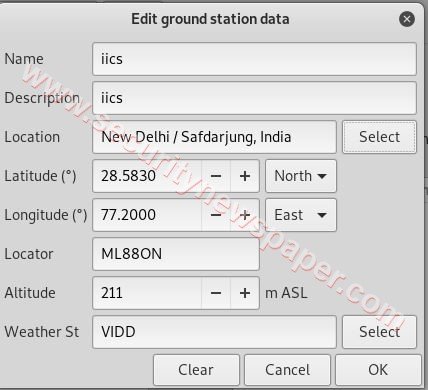
- Finally, click on Ok to save the location.
- TLE Update: Here we can set the Auto-Updates and we can also Add/Delete TLE Source.
- Message Logs: Here we can set log settings to keep the previous logs data or not. In this, we have different Log levels.
Preferences – Modules
Modules: In modules, we can set a default setting. In this, we have a few different options like Layout, Refresh Rates, ListView, Map View, Polar View and, Single Sat View
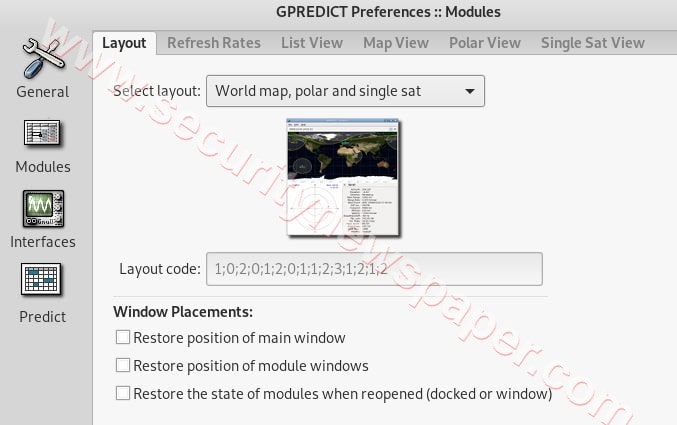
- Layout: In the Layout, we can set the default Map to view in the application
- Refresh Rates: In the refresh rates we can set the time to refresh the page.
- List View: In the list view we can select the fields, to view on the page.
- Map View: In the Map View we can select the colors to identify the options.
- Polar View: we can set default settings for Polar View Option like adding the extra Contest and colors to identify the option.
- Single Sat View: This is same as list view, we can use this enabling and disabling the fields to view on-page for a single satellite.
Preferences – Interfaces
Interfaces: In the interface, we can add automating Radio and antenna rotator control
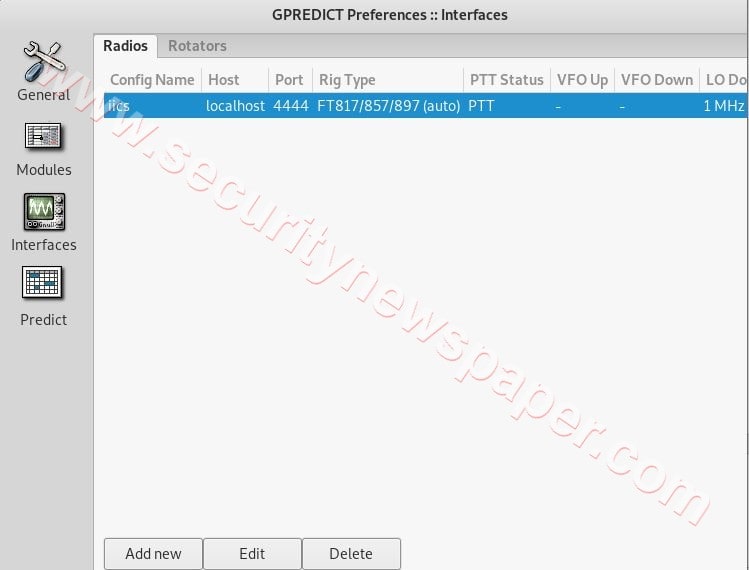
Satellite Radio: The satellite Radio services are used to broadcast the satellite services. This is used to transmit the signals from the ground station to satellite which is above the surface of the earth and the satellites send the signal back to the radio receivers.
Radio Setup: To add automating radio go to interfaces –> Radio –>Add new. There we have to enter the complete details like Name, Host, Port, and Radio Type, etc. we can see in the below picture
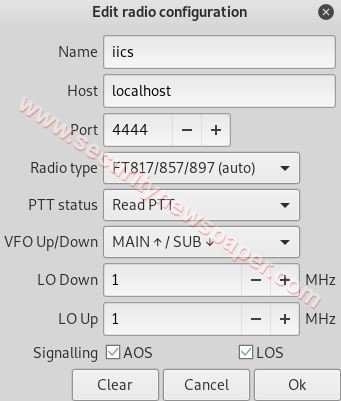
- After entering the file click on ok.
Rotators: This rotator send signals to ground stations, these are commonly used in military communication and TV, radios where the stations are available
Setup rotators: To add rotators go to preferences –> Interfaces –> Rotators –> Add new. Here we have to enter manual details and for few details set the default options.
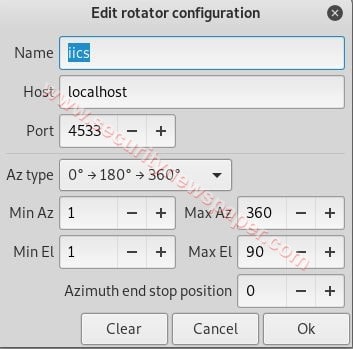
- After entering the file click on ok.
Preferences – Predict
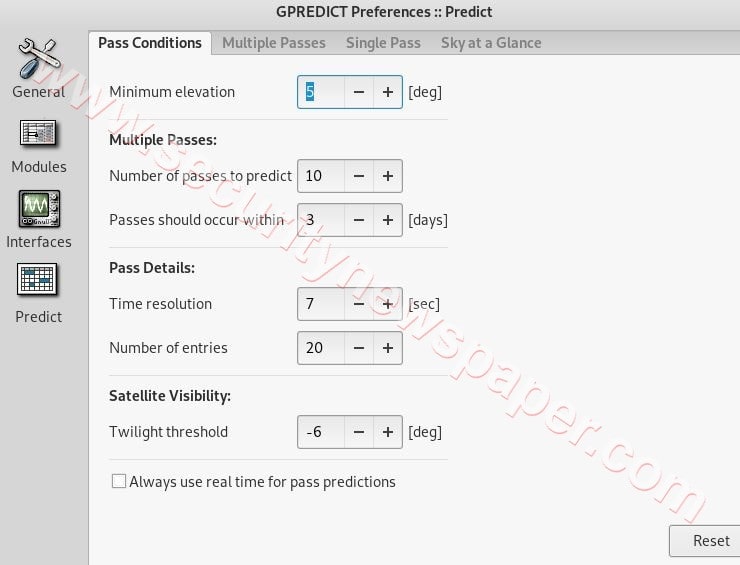
Predict: In this option we can specify the pass conditions by assigning the number, adding visible columns for single passes, and multiple passes. In the sky, at a glance, we can assign the colors for satellites to identify.
Coclusion
Here, we saw Gpredict can be configured as real-time satellite tracking program, which can also be further used to do next level of attacks.

Cyber Security Specialist with 18+ years of industry experience . Worked on the projects with AT&T, Citrix, Google, Conexant, IPolicy Networks (Tech Mahindra) and HFCL. Constantly keeping world update on the happening in Cyber Security Area.


